DDNet is a 2D platformer with tilemap-based graphics and (of course) its very own map format. As such, the game has developed some wonderful art-styles with beautiful maps.


For the purpose of this blog post, let's instead turn towards maps which you can only appreciate from a distance. We'll take a look at a very specific kind of map design: external pixel art. Most of these maps follow a very straight-forward workflow:
Some mappers have created maps with really fitting themes, which turned out really nice visually:


Other mappers... don't convince me quite as much:


For certain pixelart, it already works out well and good (mostly for one specific gamemode). However, what if you wanted larger pixel art, or more detail? Call me crazy, but what if I wanted to display full arbitrary images as pixel art? Only recently, someone asked for this in the developer chat of DDNet and was told that it's impossible. When you test out the limits, you'll hit one of two bottlenecks, depending on the approach:
So let's tackle both issues and create our very own bottleneck: Performance. Contrary to the other two approaches, we hit our bottleneck with style.
We got everything: Some math, color mixing with weird constraints and map format quirks.
First, to get everyone on board, we'll set straight what we have to work with.
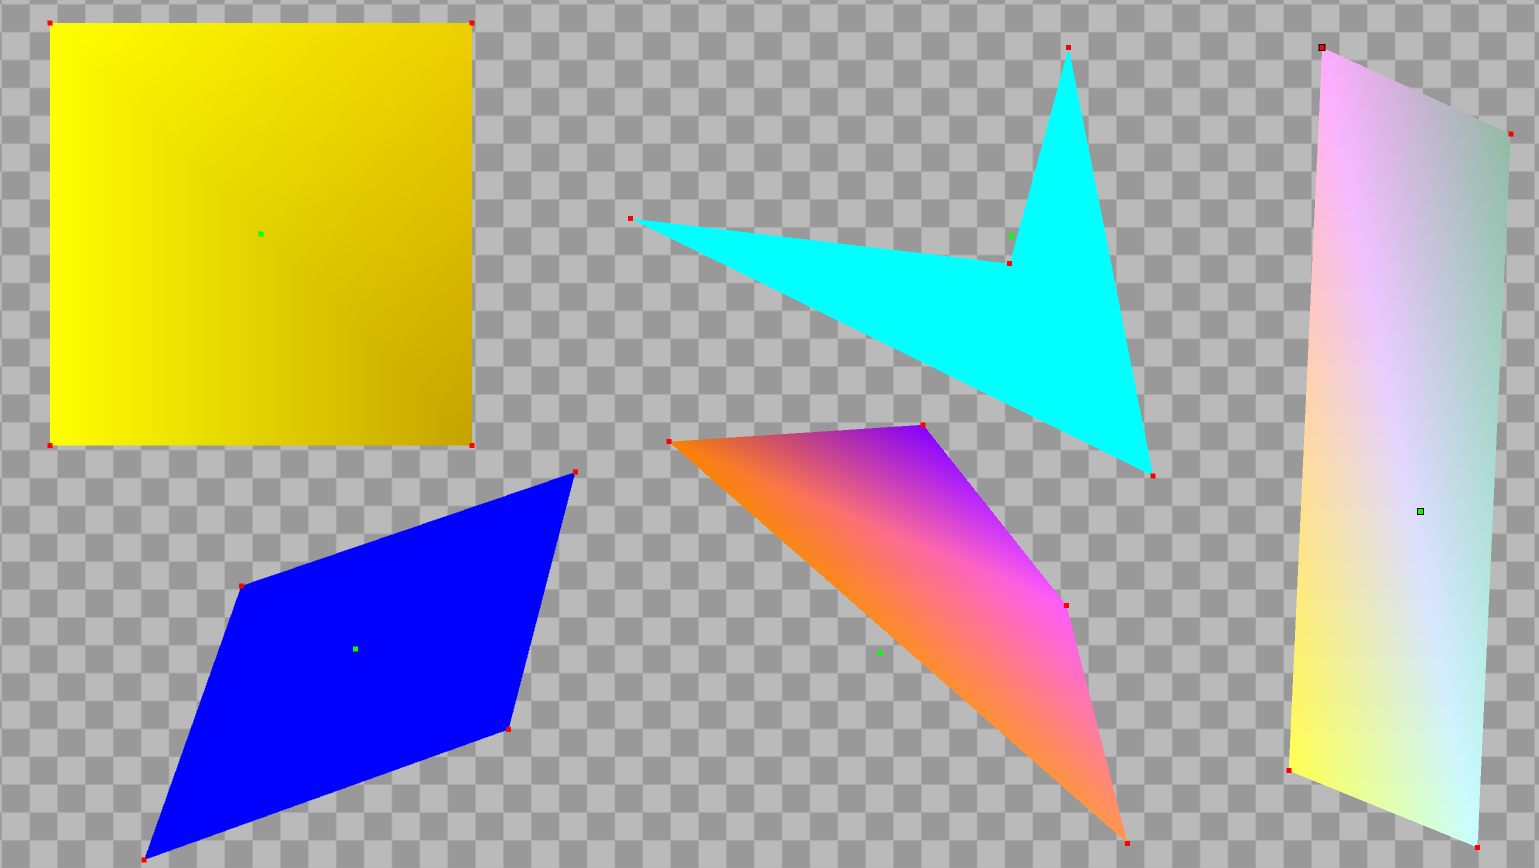
Quads are just that, quads: Four corners forming a polygon that is textured. They got all the customization you want: Position, Size, Color, Texture with UV-coordinates, you name it. Quads can recreate pixel art quite easily:
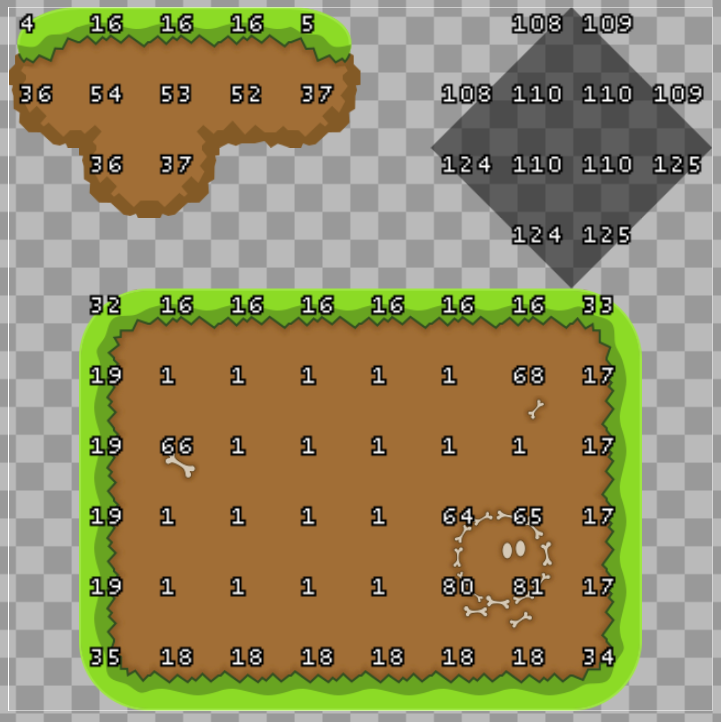
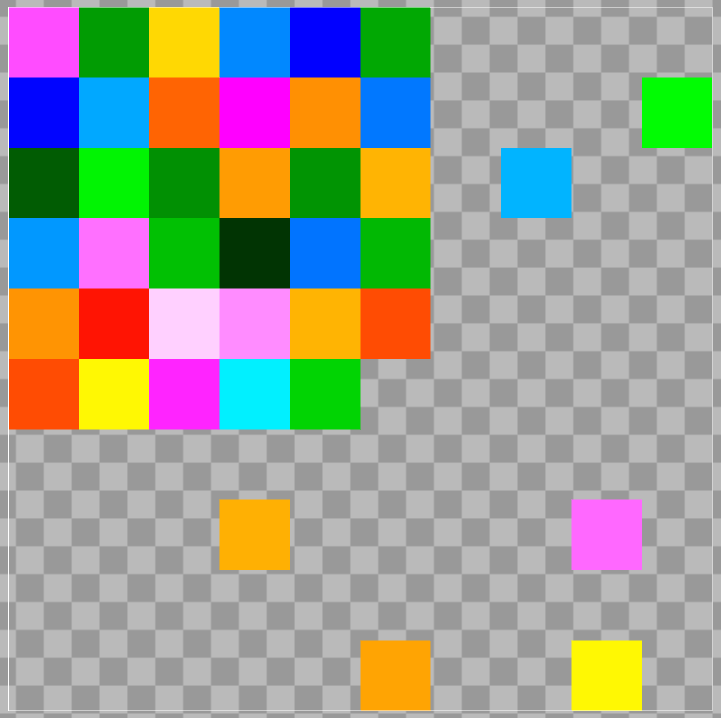
Nearly everything gameplay related, both for physics and visuals, consists of tilemaps. They are plain 2D-arrays, where each tile has an ID and some flags for rotation and mirroring. The ID is important: Its an index between 0 and (excluding) 256 and indexes into the texture that is used for the tilemap. The associated texture must be square and divisible by 16 both horizontally and vertically, resulting in 16x16 = 256 tile textures. Each tile in the tilemap is the size of a physics-tile. Our textures will be a plain 16x16 pixel image with unique colors, so that 1 pixel in the image responds to exactly one tile texture.
This is where we run into a brick wall with this approach. Each tilemap can only display 256 different colors. Drawing Pokémon will still work out alright, as they use only few colors. Arbitrary images with maybe tens of thousands of different colors... are a different topic.
Well, the two existing solutions are not satisfactory. 256x256x256 possible RGB values are around 16 million colors to display. The naive approach would just be adding amount-of-colors-in-image divided by 256 tilemap layers, each dedicated to 256 colors. No good: 65,000 tilemap layers are a tiny bit much.
We can of course do some lossy compression to reduce the amount of colors. If a color value is off by 1 or 2, out of 256 values in total, it won't even be noticeable to our human eyes. But even if we reduce the amount of colors in our color space by a factor of 64, it is still too much.
This is where we must turn to our savior: Our dear alpha channel, which grants us transparency. With transparency, we can blend multiple tilemaps together and mix-and-match tiles from each layer. A color with only two color channels has 256x256 possible color tones. By picking tiles from 2 tilemaps, we get 256x256 combinations, which sounds sort of-ish promising, so let's have a go at that.
So we want to overlay tilemaps to mix their colors. The thing is: we don't have separate transparency for each color channel: We can't just mix red, green and blue individually. Instead, we have one alpha value for all three (RGB) color channels combined.
	alpha = new_color.alpha / 255

         color = new_color * alpha + old_color * (1 - alpha)
Mixing playground: The two colors are mixed, the slider controls the alpha. Left is the base-color and the right one is alpha-blended on top.
This kind of color mixing doesn't exactly give us much freedom. In particular, the extreme values 0 and 255 are very hard to reach. Try to mix together white or black or a strong red. Mixing converges to the middle, and the extreme values can only be mixed by themselves.
In case you want to approach and solve the problem by yourself, this would be your time to halt reading.
To approach the problem and get appreciation for the beauty of the problem, let's do 2 color channels first. I'll first spoil that we'll only require 2 tilemaps to achieve our goal here. We can visualize the color space which we cover with a simple 2D coordinate system.
The first solution we'll take a look at, uses the same texture for both tilemaps. In the map format, we can change the alpha of a tilemap separately from the used texture. We'll use that and have full alpha in the texture itself. Our texture simply has all multiples of 17 from 0 to 255 for both color channels, which are 16 values each. We need all permutations (combinations), so we have 16x16 = 256 values.
Both our tilemaps use the same texture, but that perspective is misleading since they are layered on top of each other with alpha. Our bottom tilemap won't need alpha, since it is our base color we mix with. The top tilemap has alpha 15, which is exactly . During mixing the first tilemaps value is and for the second one, before they are added together. Their respective highest values (adjusted to alpha blending) are 240 and 15.
From now on all elements are interactive: Click on colors in the layers and use the sliders to play around with color mixing. Each layer's color is adjusted to its share of the final color, and the layers in front always add their color to the layers in the back. With this setup, the color that the right-most layer selects is always the fully mixed, final color. Hover over the color of any layer to check its base color, it won't change when mixed.
The horizontal x-axis controls the amount of blue, while the vertical y-axis controls the amount of red. With these two components, we can pick any 2-color-channel color and mix it with the two layers: The first layer picks the rough square that contains the wanted color, and the second layer smoothens it out. Note that the second layer is not a single color! You can just barely make out different colors in the second layer, if you:
This approach sadly doesn't scale to the third color channel all that nicely. Feel free to try it out, but it does fall apart after 2 color channels. If you do figure out another solution, please contact me via [email protected].
Let's consider a whole different approach. We'll try to always dedicate one layer to exactly one color component. In particular, we know that the values 0 and 255 will probably be in every single layer, no matter which component. This was because we can't mix the values 0 and 255 without using these values themselves. So the color we'll focus on will use half of all values by skipping every other value: 0, 2, 4, ..., 254, and loop through those values twice. The other color channel is on 0 for half the colors, for the other half 255. We'll have alpha on the second layer, so both layers affect the final color equally.
To understand why this works, think about it this way: With alpha the final color is just . So the color we can finely manipulate is practically just a value from 0 to 127, while we can freely choose 0 or 128 for the second color. We want any arbitrary value between 0 and 255, so with the 0/128 we can just select in which half our value is, and the other layer selects the correct value in that half. In the playground above, the values are already divided by 2, so the color you select in one layer is simply added on top of all colors in the other layer, which then displays possible final colors. The beauty of this solution is that this works for both color channels by just being a symmetric solution with alpha . This time, we can even extend this solution to the full 3 color channels, RGB.
Now then, three color channels. We'll need 3 layers to accommodate them. Likewise, we'll also need to somehow accommodate all three color channels in the textures of the layers. alpha is still our chosen path, meaning that after the first two layers merge to 1:1 (fifty-fity), the third layer makes that 1:1:2. In the end, the first and second layer each have a final share of 25%, and the third layer 50%. Our colors in each layer will now need to share more of their space: The dedicated color can now only go in steps of 4: 0, 4, 8, ..., 252, and we cycle 4 times through those values. For the other two colors we once again have 0 and 255 to care about, so in the 4 cycles the two other color channels go through 0 0, 0 255, 255 0, 255 255.
How the hell do we properly mix color now? Well, the two colors of the first two layers still work very nicely: Since their share of the final color is 25%, every fourth value becomes all the values from 0 to 63. 25% of 255 is ~64 and 50% ~128. With the other two layers, we can actually select the quarter in which our value is, and with the dedicated value we can select the right one.
The third color channel is a bit more unfortunate. Since its share is 50%, we can only ever reach every second value. Layer one and two provide 0 or 128, while the third layer has the values 0, 2, ..., 126 for the third color channel.
Select any color, move any slider, or select the colors in the layers manually: The input color will always match the color selected in the last layer. Like before, the colors in the layers are already adjusted to their share of the final color. In the first layers, red only has values 0 to 63, and green and blue only either 0 or 64, since the share of the first layer is 25%. The last layer's share is 50%, which is why its base colors are more intense.
Note that there is some redundancy for blue: For example, if we want to raise only blue to 64, all the layers are capable of achieving that. Aaactually, we can use that, by instead of having a 64 for blue in the first two layers, we change one 64 to 63. This way, we lose the 255, but regain the lost values between 64 and 192. In my experiments with the interactive elements above, I figured out that I can differentiate colors much better which are in the middle of the color space, so this is a plus.


Above, you can see an artwork imported as a pixelmap in the DDNet editor. Its dimensions are 2520x1080 with 171978 different colors in total. The images above are ordered just like the mixing playgrounds from before:
Whew, that was a lot to unpack. To recap: The first color channels (Red and Green) can be matched perfectly, the third color channel (Blue) not quite perfectly, but more than good enough. Color differences of 1 value are considered to not be visible to the human eye, which is why such small value changes are sometimes even used to hide data. We sadly do lose the ability to embed images with pixels that have different alpha values. Fully transparent pixels are actually supported. Apart from that, we can only kinda try to change the alpha of the entire embedded image by playing around with the alpha values of the individual layers.
All in all, I'd consider this project to be a success. I spend quite some time on it, but enjoyed it for the most part. The hardest part for me was writing this blog post, I hope you enjoyed it!
Big thanks to Zwelf for our brainstorming sessions to figure out this fun riddle!
Luckily, especially for our sanity, we humans only perceive 3 different colors :)
There are some annoying details which I left out up until now. Some might already have noticed some irregularities. If you enjoyed the beauty of the solution above and want to continue in blissful ignorance, feel welcomed to stop here. Don't get me wrong, the idea does work as-is, but there are a couple of annoying off-by-one errors which ruin some symmetry and nice math.
For each color channel, the two layers which are not responsible for it provide either the value 0 or 255 in that color channel. With mixing, it gets divided by 2 (or 4), which sadly isn't 128, but 127.5. Luckily, the renderer (or rather, the GPU) rounds the color values. So 127.5 would be 128 after mixing, as long as the value it gets mixed with doesn't interfere with the remainder. However...
Remember how the alpha is also a value between 0 and 255? Yet again, we fail to halve 255. With both 127 and 128 we have to be really, really careful with the rounding. This also makes the math of the first two color channels asymmetric.
Luckily, as a programmer, I gave my computer the math and it figured it out nicely. We do lose the values 254, 255 in the first two color channels, but that is a small loss. We'd lose other values depending on if the last layer uses alpha 127 or 128, but this trade-off was nicer. The rounding screwiness actually repairs half of the lost blue values naturally, nice.
Step by step video guide (youtube link):
You can find the scripts here.